Websites are all around us. But how do they work, and how can you make your own? Sure, there are services out there that “create your own website” in seconds, but… is it really your own?
In this guide, we’ll be talking networking, HTML and how the web actually works.
Note: For simplification purposes, we’ll be assuming HTTPS doesn’t exist yet.
1. Terminology
We can’t talk about things without knowing what things are. There are a few things that we have to know before we can start.
- Data: This is a very abstract word, and just means “some sort of information we can bundle together”. The current temperature is data. Whether or not you’re wearing pants is data. The newspaper contains data. Enemy locations in video games is data. Wikipedia says data is plural, but we are rebels.
- Server: Something that sends data. Usually it sends data when we ask for it, but just like annoying real-life servers who just refill your glass without you asking, servers might also send data when they feel like it.
Note: A “server” is usually a computer, but when we put words before it, like “web server” or “game server” it’s a program running on the server. This might sound confusing at first, but it will make things easier to explain. - Client: Something that wants data. For example, your web browser wants a website. Your game wants enemy locations.
These words should be enough for me to start explaining.
2. The Basics
If we simplify away a lot of things, a normal exchange between a client and a server might look like this:
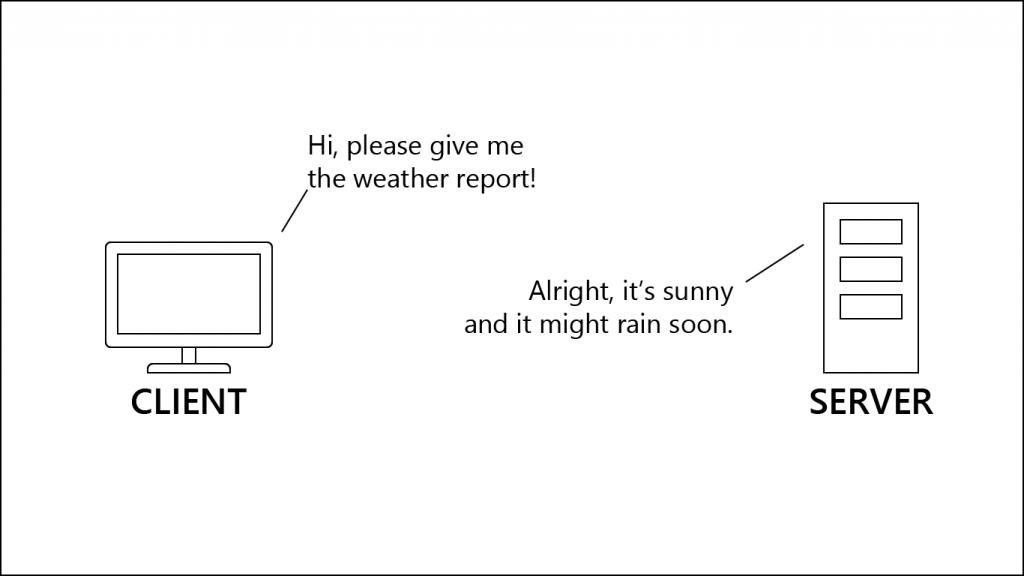
Now, once we get into the complicated parts, we won’t be able to keep up this speech-bubble style everybody likes so much. Therefore, here’s the same exchange, but in the style I’ll be using sometimes from now on:
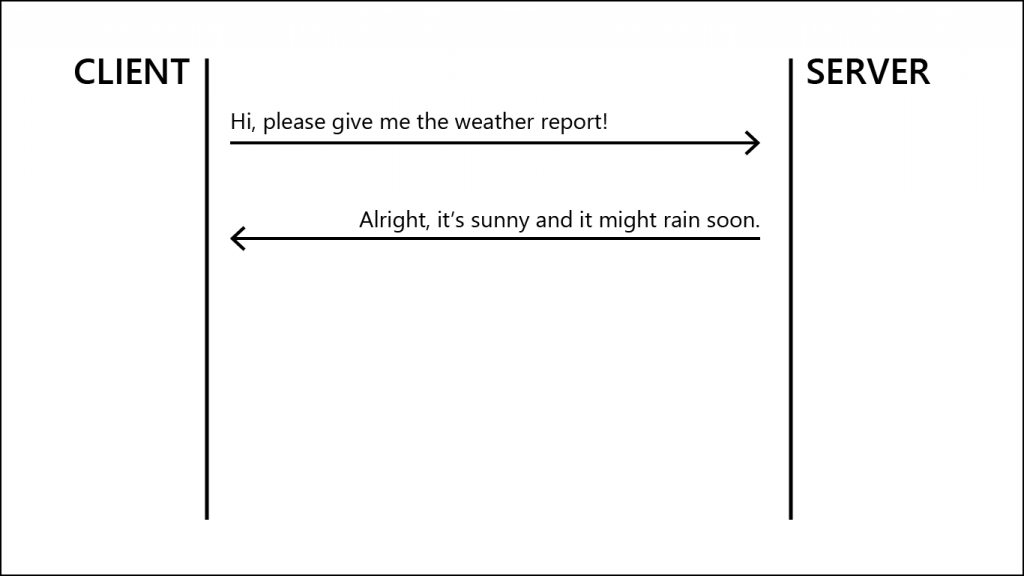
See? Much simpler, and you can see who tells what to who.
Now, we can get into the technicalities.
3. IP
Imagine you’re sending mail (actual, physical, paper mail) to someone. In the real world, we use addresses with country, city, postcode, street, and so on.
In the tech world, we use IP addresses. IP stands for Internet Protocol and is a standard that tells us how to use these addresses (among other things). The first published IP standard was version 4 (the other three were developed in private), and that was back in 1982! We have been using that ever since, since it’s so good. We call it IPv4.
At some point, someone came along and said “we gotta work on something new because some things in version 4 are outdated”. And thus everybody proposed stuff for version 5 and no one could really make up their mind. And then the guys who make the standards, the IETF, said “this is too messy, we’ll just collect ideas and then just skip to version 6”.
IPv6 was first proposed in 1998, and finally became a ratified internet standard in 2017. It solves many problems and has some cool new features, and just like with every new standard in the world, no one cares. “We like our old standard, it has served us so well!”, everybody said. “Fine”, said the IETF, “whatever. You can choose which one to use, or even both.”
And because that worked out so well, we will be explaining IPv4 here, with the occasional note on how things work in IPv6.
Now, back to IP addresses. When someone talks about “IPs”, they’re not talking about the standard, they’re just too lazy to say “IP addresses”, and so am I. Therefore, I’ll say “IP standard” whenever I’m talking about the standard.
Now, what do these IP addresses look like? They are, in essence, just a really big number. For example, some server at Google has the number 2899907406, so if you go to http://2899907406, you’ll open Google.
But no one likes big numbers. And since we work in the tech world and everything can be represented in bits, we use four steps to get our trusty IP format:
- Convert number to binary (bits):
10101100110110010001001101001110 - Divide number in four equal parts:
10101100-11011001-00010011-01001110 - Convert each part back into a decimal number:
172-217-19-78 - Put dots in place of the spaces:
172.217.19.78
And there you have it. It’s still the same number, but much more readable now. And it still does the same thing, try clicking on http://172.217.19.78.
Every device that is connected to a network has an IP address. Usually even two. One is your external IP (in real-life terms, this would be your address) which identifies your home, and one is your internal IP (in real-life terms, this would be something like “bedroom” or “kitchen”) which identifies a single device.
When sending a package in real-life, you don’t know whether the contents are for the kitchen or for the bedroom, you just know the address of the person. And it’s the same way in the tech world. You send data to an external IP address, and then the network there sorts things out between themselves. That technology is called NAT and I won’t be explaining how it works.
4. Routing
Now that we know what the addresses look like, we can talk about routing. In real-life, when you send a package, it’s delivered in a few steps:
- You put something from a room into the package.
- You put the address of the recipient on the package.
- You bring the package to a local post office.
- The post office sends it to a central hub.
- The central hub sends it to another central hub.
- Repeat step 4 a bit.
- The final central hub sends it to a local post office.
- The local post office delivers it to the recipient.
- The recipient puts it into one of his rooms.
This process looks something like this:
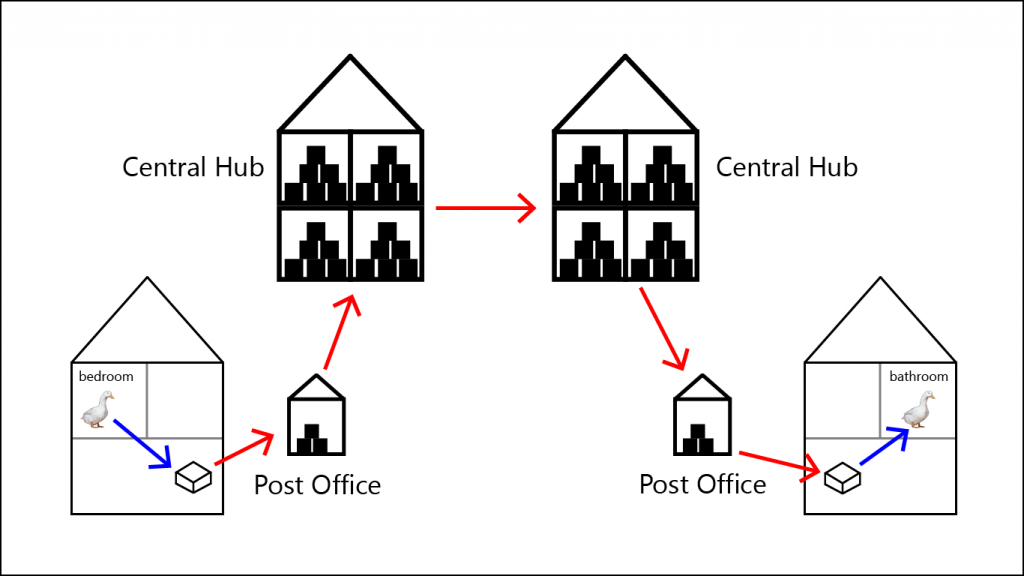
Now, the blue arrows are completely irrelevant for the postal service. They only care which address you send from and which address you send to. Which room the recipient chooses is completely irrelevant for the postal service.
Now, in the tech world, the process works similar. Instead of “post offices” and “central hubs”, we have “routers”. Maybe you’ve heard the word before. And now you know why they’re called routers, it’s because they route your data. Take a look at this:
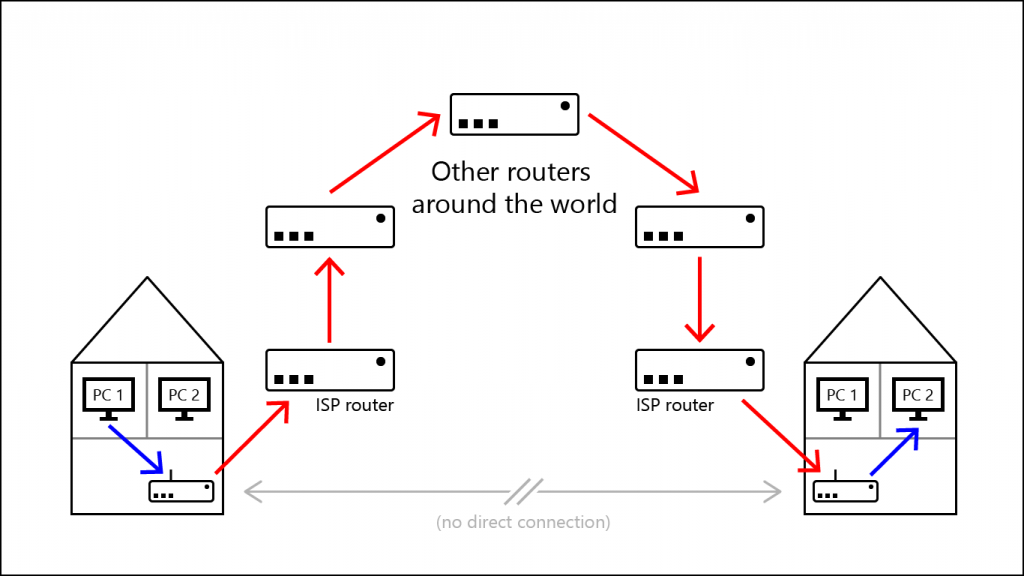
All of these routers have their own IP, just like the post office and the central hubs have their own address.
Note: This image makes it seem like you’re sending data from one home to another, but really this process is universal and also happens when you visit Google or any other website. For a visual proof of that, press Windows+R, type in cmd and press Enter. This is the command line. To see the route your data takes from your home to Google, type in tracert -d -4 google.com.
“tracert” stands for “trace route”, which is what the command does. -d is just a thing to tell the command to hide unnecessary information, and -4 is for IPv4 (which we discussed earlier). You can replace google.com with your favorite website and see how many steps your data has to take to get there!
This is also why you need an ISP to visit websites, because someone has to accept your data to send it across the world.
Now that we know how data is sent across the world, we can talk about TCP.
5. TCP
In the previous chapter, I talked about routing. To simplify things, I will assume here that devices talk directly to each other, but of course, we both know better. I just don’t want to draw thousands of routers on each image.
Next to IP, there is a second protocol, it’s called TCP. TCP stands for Transmission Control Protocol and is used to establish a connection.
What does “establish a connection” mean? Let me give you an example. Imagine you see someone standing around with their shoes untied. You approach them from behind and say “Your shoes are untied”. In all likelihood, they will turn around and say “what?”.
But if you approach them from behind, say “excuse me” and they turn around and say “yes?”, you have established a connection. The person is now ready to listen to you.
TCP works the same way. If you want a server to listen to you, you don’t just ask the server something. You send a series of messages first, which we will give short names so you don’t have to memorize single bits.
For servers it works like this: You send a TCP request (SYN), the server says “I got your request, let’s talk” (SYN-ACK), and you say “alright, I’ll send some data” (ACK).
After you’re done, you send “Let’s stop talking” (FIN), the server says “okay, you want to stop talking” (ACK). Then it goes the other way around, the server says “Let’s stop talking” (FIN), and you say “okay, you want to stop talking” (ACK). After both sides have done this, the connection is closed. Visually, it looks like this:
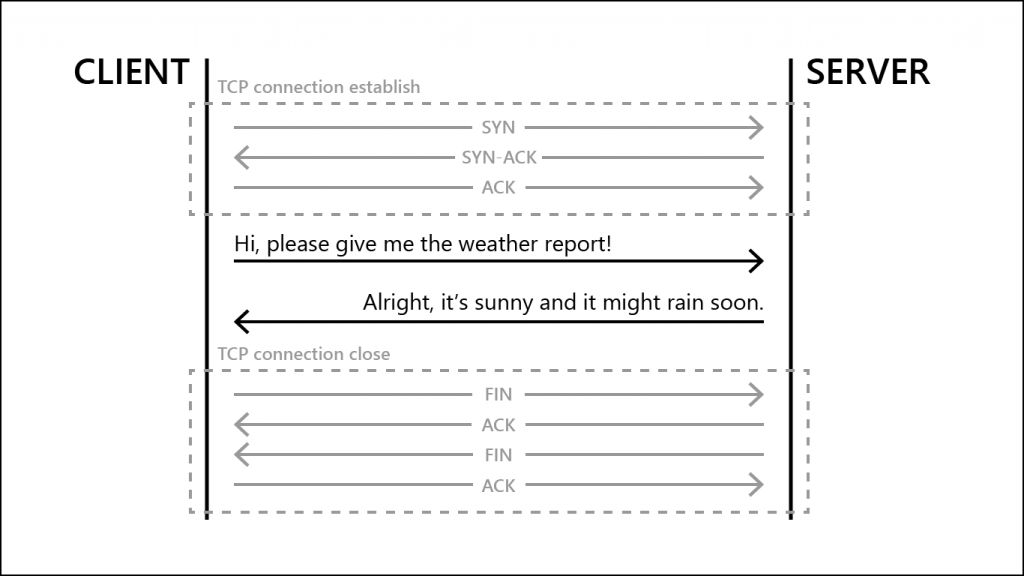
These TCP connections are the basis of every single connection your PC makes to other servers. Be it websites, game servers, weather reports. There’s a second protocol called UDP, but we’ll talk about that another time.
In fact, TCP is so integrated into everything that there’s not really a straightforward way of establishing a connection to a server using just TCP. There’s telnet, but we’ll be talking about that once it is actually useful.
Now, computers usually don’t speak English. You can’t just literally send the words “please give me the website” and it will hand the website to you. After you established your connection, you need to follow certain protocols.
6. HTTP
In tech, everything has cool names. That’s why text on your screen isn’t just text, no, it’s hypertext. And to display that hypertext, we have our own language, which is called HTML – hypertext markup language. It tells the browser how to display our hypertext.
But how does that HTML get to our browser? There’s another protocol for transferring hypertext to your computer, and since programmers are lazy, it’s conveniently called Hypertext Transfer Protocol (HTTP). The version we will use is version 1.1, since HTTP 2 and above require more work to use.
HTTP has two parts: The client makes a request, and the server sends a response. It doesn’t matter how messed up or wrong the request is, the server *has* to send a response, even if it’s just to tell the client how messed up and wrong the request was.
Now, after we established our connection, we have to send a HTTP request. That sounds really complicated, but it has only three basic parts we need to memorize:
- What we want the server to do,
- what page we want do do it on
- and what HTTP version we want to use.
The first part is part of the HTTP standard definition. It gives us four options: GET to load a page, POST to send something to a page, PUT to create something on a server and DELETE to delete something on a server. Since we just want to load the page, we use GET.
(Note: Of course you can’t just send a DELETE to a random server and expect it to do much, servers protect against it)
2 is just the subpage you want to visit, for example, to visit http://example.com/test, your second part becomes /test.
We know 3 already, it’s version 1.1. Therefore, our third part is HTTP/1.1.
This means that if we want the server to send us http://example.com/test, we will open a TCP connection and send:
GET /test HTTP/1.1
What we just sent is called a HTTP header, because it is only instructions. HTTP also allows us to send content to the server, but we don’t want to, so we just end the request with two line breaks.
The server will answer with four parts:
- The HTTP version (usually the one we chose)
- A status code telling us if everything is okay or not
- A custom message belonging to the status code
- The content we asked for
The HTTP status codes that the server sends back are always a 3-digit code, and the first digit usually tells you broadly what is happening:
| First digit | Definition | Layman’s Explanation |
|---|---|---|
| 1 | Info | I’m not done processing your request yet, but I wanted to tell you that I haven’t crashed yet. |
| 2 | Success | All is well. |
| 3 | Redirection | The site you’re looking for is somewhere else. |
| 4 | Client Error | You messed up. |
| 5 | Server Error | We messed up. |
The message after the code isn’t standardized, but there are de-facto standards that everybody just accepts when it comes to them. Therefore I’ll be using these messages in my examples.
The status codes you’ll encounter the most are:
200 OK– all is well, here is your page.404 Not Found– the server can’t find the page you want.400 Bad Request– your HTTP request had a mistake in it.
Given a correct request, a response might look like this:
HTTP/1.1 200 OK

<!doctype html>
<html>
<head>
    <title>Example Domain</title>
</head>
<body>
<div>
    <h1>Example Domain</h1>
    <p>This domain is for use in illustrative examples in documents.</p>
    <p><a href="https://www.iana.org/domains/example">More information...</a></p>
</div>
</body>
</html>
Remember how I said HTTP wants two new lines after the header? Here you can see why, because it uses these two lines to distinguish the header from the content. The header is only used to tell the browser how to handle certain things. The content is what the person opening the website sees.
In our cool diagram, it looks like this:
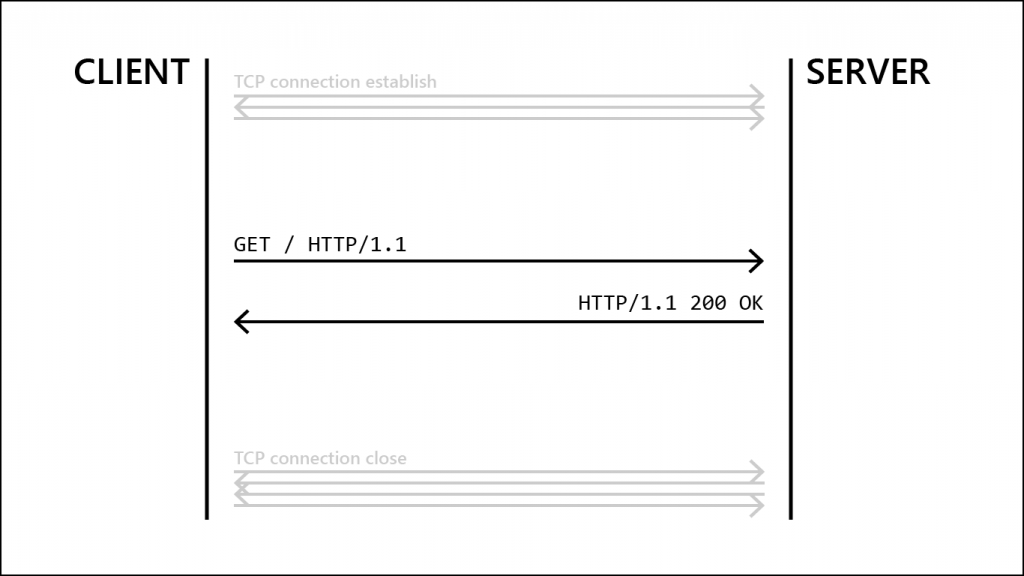
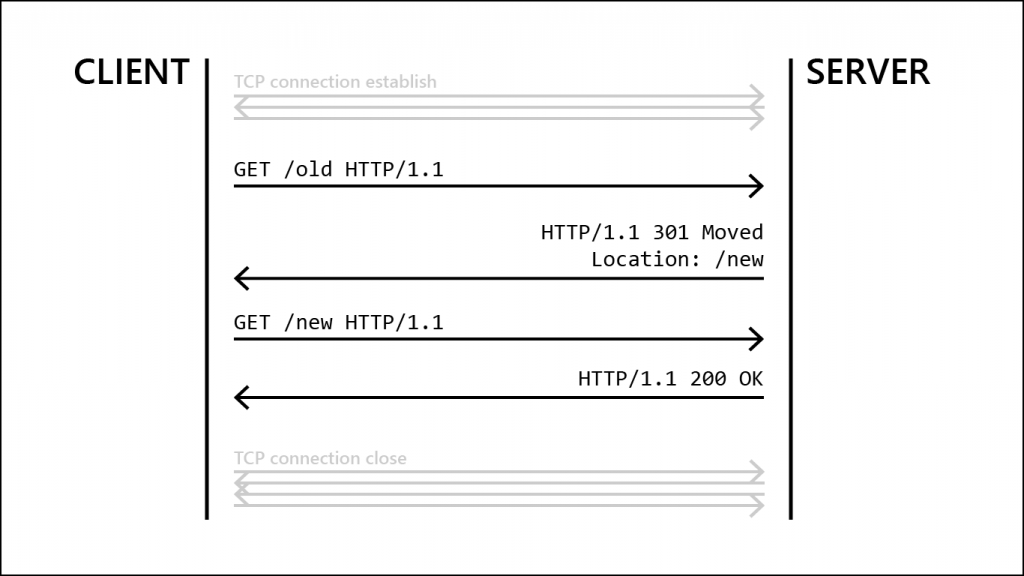
The browser is also nice and handles certain situations for us. For example, have you ever noticed that some addresses you wanted to visit change as soon as you open them? Try, for example, opening https://osm.org, and you will notice that you will actually open https://openstreetmap.org. That’s because the server answers with the status code 301, which means our site is somewhere else. And instead of displaying that info to us so we have to open the new site ourselves, the browsers just automatically sends a new GET request to the new location. The exchange looks something like this:
There is a world of other HTTP codes out there, and most are for very specific situations. For example, code 208 is described as “The members of a DAV binding have already been enumerated in a preceding part of the (multistatus) response, and are not being included again“. Yeah. Now you know more.
We almost made it! One last piece is missing: How does my browser know which IP is behind example.com?
7. DNS
DNS stands for Domain Name Service. A domain name is something like example.com or maps.google.com or openstreetmap.org.
The service that it provides is mapping domain names, commonly called domains, to IP addresses. In other words, you send it a domain name, and it will respond by telling you the IP address behind thename.
There are a lot of DNS servers out there, and you will automatically use the default one for your system. For many systems, this will be the Google DNS at the IP 8.8.8.8 (beautiful, isn’t it?). The entirety of DNS is itself a whole new blog post, therefore we will only be covering the very basics here.
The request you send to a DNS server contains two parts: The record type we want to know more about, and the domain. The record type we want to know more about here is called a Type A Record. The A in it stands for Address because we want to get information about an address. Other record types are, for example, MX for email and LOC for geographical locations.
Knowing that information, a typical request might look something like this:
A google.comThe server will answer with a few parts.
- First, it will repeat the domain you requested so you know it understood the request.
- Then, it will tell you that the website is located on the internet by adding an
IN. - It will then tell you the type of record you requested, so you know you’re getting what you asked for.
- It will then, finally, tell you the IPv4 address that is behind the domain name you requested.
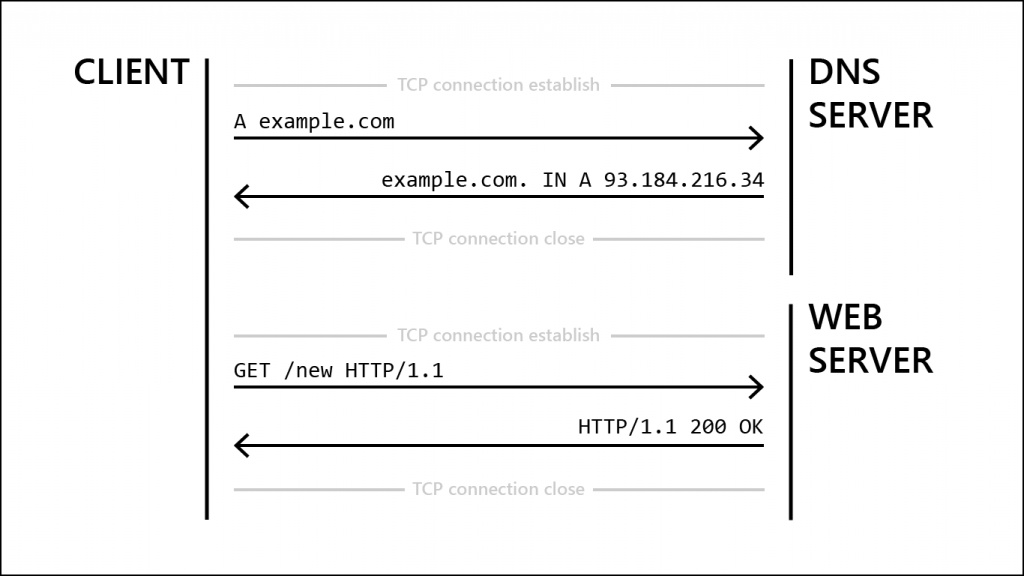
This means, when you open a website, say example.com, the first request goes to a DNS server to find out where example.com is located. This might look like this:
And congrats, that’s the basics of how a website works!